Archive for the ‘Uncategorized’ Category

AcmePacket: session constraints

Wednesday, December 31st, 2014

# show sessions or # monitor session gives you a whole statistics of active sessions on your session director.

What to do if you want to see the number of sessions on each session-agent? Use # show sipd agents

This extremely useful command can help you to destinguish the suspiciously high (for your network) connections count on a concrete session-agent. And you will see the problem agent while being DDoSed or under real high load. Or just see sessions per session-agent.
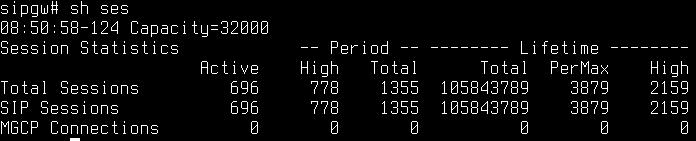
# show sessions
The left column shows the number of active sessions on your Session Director. The right one demonstrates the highest number of sessions ever been on SD:
constr_show_sessions

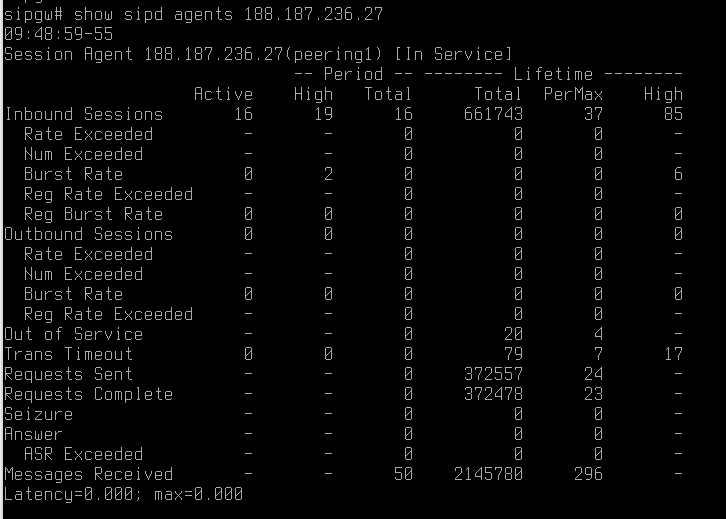
This is how # show sipd agents looks like:
constr_show_sipd_agents

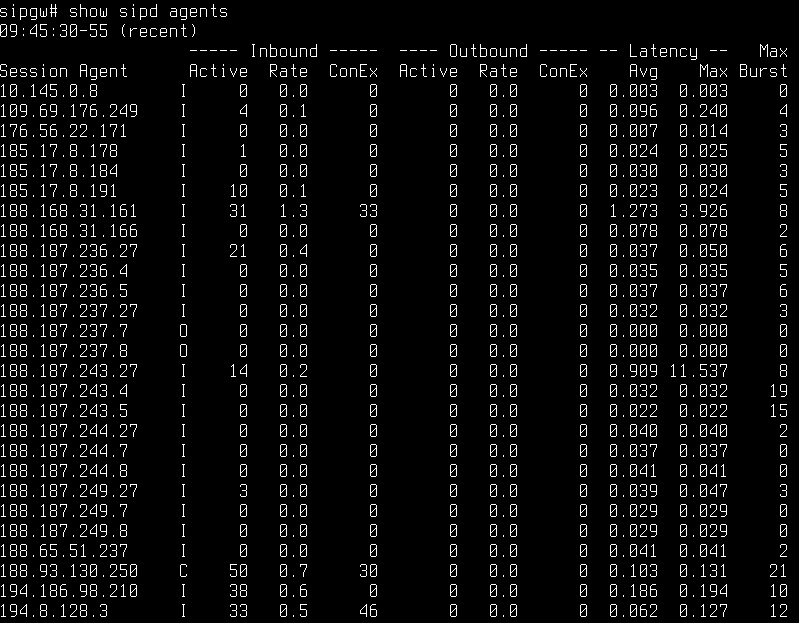
The letter I in the second column means that the session agent is ‘in service’.
The letter O means that it’s ‘out of service’, unused.
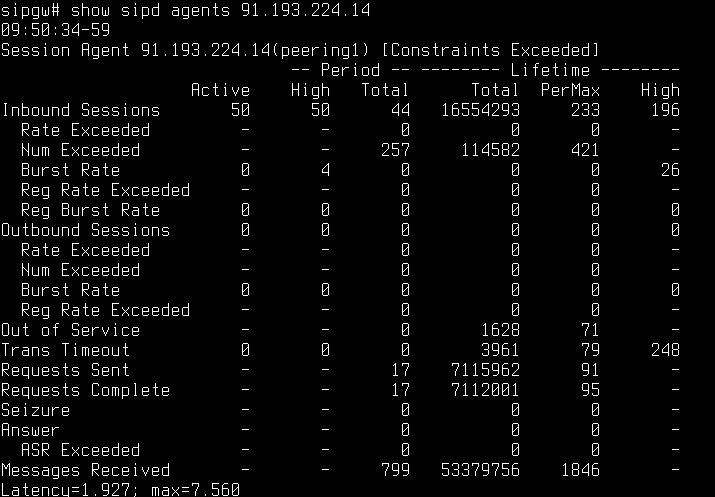
The letter C means that constraints are configured and are used right now: the number of sessions is higher than allowed. The ‘Active’ column shows the number of sessions. The column ‘ConEx’ is ‘Constraints exceeded’ – the number of ignored due to the limitations sessions for the last 100 seconds.
As you can see, session-agents may be inbound and outbound. In this example we see only inbound, they are peers with SIP providers. The outbound are peers with Asterisk nodes in the core of the network, they also have such statistics.

It is possible to see a detailed statistics for any of the configured session-agents:
# show sipd agents %ip address% or # show sipd agents %session-agent name%
Have a look at session-agent which is marked with I letter (in service):
constr_show_sipd_agents_i

And one more example for the session-agent with ConEx – constraints exceeded:
constr_show_sipd_agents_c

Constraints can be configured either in # configure terminal -> session-router -> session-constraints and then applying them variant_1) on the sip-interface (# configure terminal -> session-router -> sip-interface -> constraint-name), variant_2) on a realm (# conf t -> media-manager -> realm-config), or for the session-agent directly.

Here’s an example of a directly applied (but disabled) constraint on a session-agent:

constr_ses_ag_constr
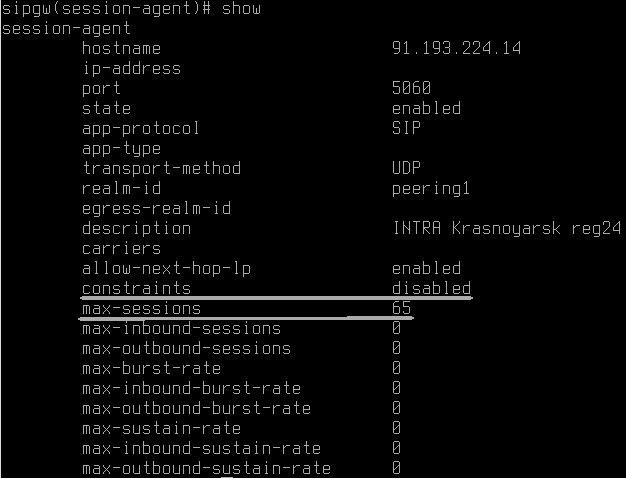
Just be sure to set ‘constraints enabled‘ in your session-agent, not only the value, otherwise they will not be applied.

Asterisk: asterisk dead but subsys locked

Tuesday, September 23rd, 2014

Problem: After successful installation from source (CentOS 6.5 x86_64, Asterisk 11.12.1) you get:

root@twt [~]# service asterisk status
asterisk is stopped
root@twt [~]# service asterisk start
Starting asterisk:
root@twt [~]# service asterisk status
asterisk dead but subsys locked
root@twt [~]# asterisk -rv
asterisk: error while loading shared libraries: libasteriskssl.so.1: cannot open shared object file: No such file or directory

Solution:
ln -s /usr/lib/libasteriskssl.so.1 /usr/lib64/libasteriskssl.so.1

Unix shell: list directories only

Friday, June 27th, 2014

A simple question with the answer not so simple to find.
For a current directory:

lexus@lexus:~$ ls -dl */
drwxr-xr-x 16 lexus lexus 4096 Apr  1 16:16 KAZANTSEV/
drwxrwxr-x  3 lexus lexus 4096 Aug  5  2013 Storage/
drwxrwxr-x  2 lexus lexus 4096 Feb  9  2012 Ubuntu One/
drwxr-xr-x 11 lexus lexus 4096 Jan  3 17:14 VirtualBox VMs/
drwxrwxr-x  2 lexus lexus 4096 Jun 10 17:09 dbn/
drwxr-xr-x  2 lexus lexus 4096 Jan 10 10:41 dwhelper/
drwxr-xr-x  3 lexus lexus 4096 May  2  2012 fluxmenu/
drwxr-xr-x  2 lexus lexus 4096 Feb  5 15:28 fontconfig/
drwxrwxr-x  2 lexus lexus 4096 Apr 18 17:24 images/
drwxr-xr-x  6 lexus lexus 4096 Oct 31  2013 sipvicious-0.2.8/
lexus@lexus:~$ 

For some other directory:

lexus@lexus:~$ ls -dl /tmp/*/
drwx------ 2 lexus lexus 4096 May 30 07:08 /tmp/CRX_75DAF8CB7768/
drwx------ 2 lexus lexus 4096 Jun 26 12:23 /tmp/acroread_1000_1000/
drwxr-xr-x 2 lexus lexus 4096 Jun 18 16:52 /tmp/hsperfdata_lexus/
drwx------ 2 lexus lexus 4096 Jun 25 18:36 /tmp/libgksu-lBNuPo/
drwx------ 2 lexus lexus 4096 Jun  6 14:57 /tmp/mc-lexus/
drwx------ 2 lexus lexus 4096 Jan  1  1970 /tmp/orbit-lexus/
drwx------ 2 root  root  4096 Jan  1  1970 /tmp/orbit-root/
drwx------ 2 lexus lexus 4096 Jun 11 16:48 /tmp/plugtmp/
drwx------ 2 lexus lexus 4096 May 26 17:59 /tmp/ssh-ftcIDV2jxXYG/
drwx------ 2 lexus lexus 4096 May 26 17:59 /tmp/ssh-tzuelndrwY3i/
lexus@lexus:~$

Brute your trunks, dial out

Friday, June 27th, 2014

A small snippet of dialplan how to dial if some trunk is not reachable.

Imagine, we have two SIP-trunks to dial out – [trunk1] and [trunk2]. You have to set ‘qualify=yes’ for both, otherwise this method will not work.
We’ll use the SIPPEER function with the ‘status’ argument:

; Func SIPPEER
exten => 401040,NoOp
    same => n,NoOp( [trunk1] SIPPEER info: ${SIPPEER(trunk1,status)})
    same => n,NoOp( ;===================================== )
    same => n,NoOp( [trunk2] SIPPEER info: ${SIPPEER(trunk2,status)})
    same => n,NoOp( ;===================================== )
    same => n,GotoIf($[${SIPPEER(trunk1,status)}= "OK"]?t1dial:t2)
    same => n(t1dial),Dial(SIP/trunk1/${EXTEN},5)
    same => n,Hangup
    same => n(t2),NoOp( [trunk1] is UNREACHABLE, trying [trunk2] in 1 second ... )
    same => n,Wait(1)
    same => n,GotoIf($[${SIPPEER(trunk2,status)}= "OK"]?t2dial:hang)
    same => n(t2dial),Dial(SIP/trunk2/${EXTEN},5)
    same => n,Hangup
    same => n(hang),Playback(have-a-rest)
    same => n,Hangup

FreeSWITCH: listen on UDP only

Friday, April 18th, 2014

As a default behavior, FreeSWITCH SIP profiles listen both on TCP and UDP. To disable any of them, use bind-params in /conf/sip_profiles/some_profile.xml

https://wiki.freeswitch.org/wiki/Sofia.conf.xml#bind-params

top

Saturday, March 29th, 2014

You may select the columns shown by the ‘top’ command with the ‘f’ key. Just run top and press ‘f’. Columns marked with * are shown, others are not.

In some versions of ‘top’ you have to select the [un]displayed item with arrows and activate/deactivate them with ‘d’ or space.

Asterisk: round-robin dial out through trunks

Thursday, March 27th, 2014

Imagine that we have 3 trunks for dial out and we must balance outgoing calls in random order. This could be done with the RAND function. Module func_rand.so must be compiled and loaded.

sip.conf:

[trunk1](trunk_preset)
host=10.10.10.11

[trunk2](trunk_preset)
host=10.10.10.12

[trunk3](trunk_preset)
host=10.10.10.13

extensions.conf:

exten => _79XXXXXXXXX,1,NoCDR()
    same => n,Dial(SIP/trunk${RAND(1,3)}/${EXTEN})
    same => n(hang),Hangup()

You may say – well, OK, but what if my trunks are named not like [trunk1], [trunk2], [trunkN] and I can not substitute the last symbol in Dial application?
In this case we can write a list of trunk names (which you configured already in sip.conf) in txt file, for example rrtrunks.txt:

teliasonera-out
deutschetelekom-out
level3-out

Ensure that a ‘sort’ command is available in your *NIX system. Usually it’s a part of coreutils. Older versions don’t suit us, because they don’t have the ‘-R’ flag which means sort randomly. Newer versions have.

Then load func_shell.so and use it in your dialplan. It can execute a shell command and use its output in dialplan.

exten => _79XXXXXXXXX,1,NoCDR()
    same => n,Dial(SIP/${SHELL(sort -R /etc/asterisk/rrtrunks.txt | head -1)}/${EXTEN},20)
    same => n,Hangup()

It means that we sort randomly our list of trunks and get the first one each time.

Get rid of LibreOffice slow start

Wednesday, March 26th, 2014

Assuming your hostname is darkstar, add these lines to your /etc/hosts:

# fix libreoffice slow start
127.0.0.1 darkstar.(none)

Be sure that your hostname is the same both in /etc/hostname and in /etc/hosts .

Thanks for www.nixp.ru.

Asterisk 12 Notes

Monday, March 24th, 2014

To use ‘Gosub‘ (and also ‘Return‘, ‘GosubIf‘ and ‘StackPop‘) application you must load app_stack.so .
To make calling between endpoints possible, you must load bridge_simple.so .

To originate calls from CLI you must load res_clioriginate.so (assuming app_originate.so is already loaded).

Using ‘screen’ for multiple SSH sessions from a remote computer

Sunday, March 23rd, 2014

1. Log in to the remote server.
2. Type 'screen'. The virtual screen #0 will be opened. We’ll use it as a starting point for creating other screens.
3. Type 'screen -t server1'. This command will open one more virtual screen with title ‘server1’, we will use it for entering the server1, for example ‘ssh server1’.
4. Press Control-a and then ” (double inverted commas)
This command will list all your virtual screens. You may select any of them moving with up/down arrows and then pressing enter. Enter the screen #0.
5. From screen #0 we can create one more screen, for example 'screen -t server2'.
6. Jumping from one screen to some other can be done with Ctrl-a and then ” or Ctrl-a and the number of screen. In our case – 0, 1 and 2.
7. You may close any screen with Ctrl-D or 'exit', like usual.

Another scenario:

1. screen -S 1st_session_name to start screen with some session name.
2. Ctrl-a d to detach from session.
3. screen -ls to list all sessions and their pids.
4. screen -r %pid% to reconnect to a session with %pid%.